#
Spring Data JPA with a MySql database
This tutorial explains how we can use Spring Data JPA with a MySql database.
#
Install the MySql database
In my case I will install MySql database as a Docker container. In my case I am using Docker Desktop.
You need to run the docker pull mysql command in order to get the MySql image from docker.io.
C:\Users\Catalin>docker pull mysql

Using default tag: latest
latest: Pulling from library/mysql
e2c03c89dcad: Pull complete
68eb43837bf8: Pull complete
796892ddf5ac: Pull complete
6bca45eb31e1: Pull complete
ebb53bc0dcca: Pull complete
2e2c6bdc7a40: Pull complete
6f27b5c76970: Pull complete
438533a24810: Pull complete
e5bdf19985e0: Pull complete
667fa148337b: Pull complete
5baa702110e4: Pull complete
Digest: sha256:232936eb036d444045da2b87a90d48241c60b68b376caf509051cb6cffea6fdc
Status: Downloaded newer image for mysql:latest
docker.io/library/mysql:latest
You need to run the docker run --name my-mysql -p 3306:3306 -e MYSQL_ROOT_PASSWORD=p -d mysql command in order to create the mysql
container containing a MyQql instance in it. The container port 3306 will be exposed on the host side with the same port number.
C:\Users\Catalin>docker run --name my-mysql -p 3306:3306 -e MYSQL_ROOT_PASSWORD=p -d mysql
74d074e24c50bba5ced5e52c0cfab1006903d87be36a406fe1e1f075efe450f7
For this example, I installed a trial version of DataGrip (MySql admin client).
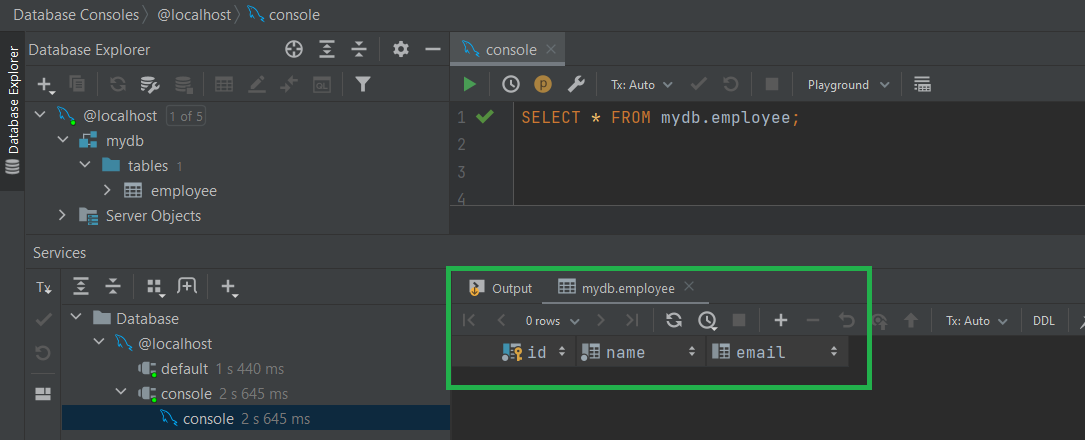
With this admin tool I create a MySql database schema named "mydb" and a table "employees" as in the picture below:

Here is the code for creating the table:
create table employee
(
    id    int auto_increment
              primary key,
    name  text not null,
    email text null
);
#
Create the Spring Boot application
Now, let's create the Spring Boot application using Spring Data JPA.
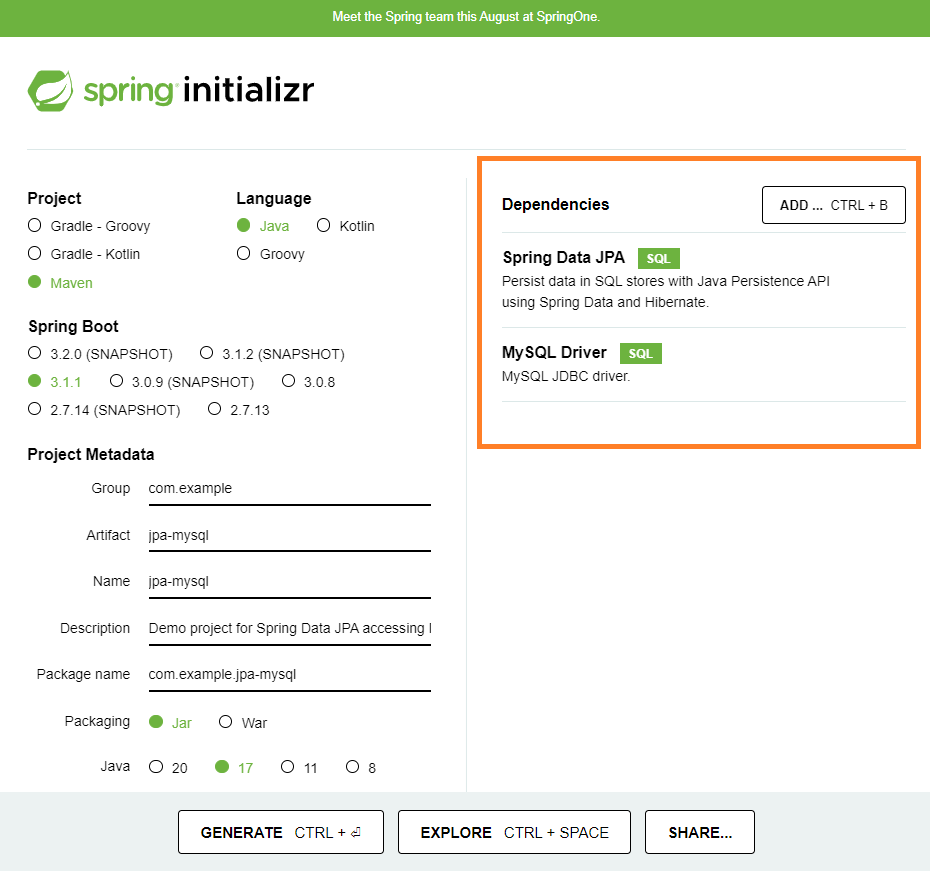
First of all I will create a simple Spring Boot application using spring initializr
as in the image below:

In pom.xml we can see the following dependencies:
<dependency>
    <groupId>org.springframework.boot</groupId>
    <artifactId>spring-boot-starter-data-jpa</artifactId>
</dependency>

<dependency>
    <groupId>com.mysql</groupId>
    <artifactId>mysql-connector-j</artifactId>
    <scope>runtime</scope>
</dependency>
Now we can create an entity class:
package com.example.jpamysql.entity;

import jakarta.persistence.Column;
import jakarta.persistence.Entity;
import jakarta.persistence.Id;

@Entity
public class Employee {

    public Employee() {    }

    public Employee(int id, String name, String email) {
        this.id = id;
        this.name = name;
        this.email = email;
    }

    @Id
    @Column(name = "id")
    Integer id;

    @Column(name = "name")
    String name;
    String email;

    public int getId() {
        return id;
    }

    public void setId(int id) {
        this.id = id;
    }

    public String getName() {
        return name;
    }

    public void setName(String name) {
        this.name = name;
    }

    public String getEmail() {
        return email;
    }

    public void setEmail(String email) {
        this.email = email;
    }
}
Info
- The entity class must have
@Idannotation for underlying the column in the database which is the primary key. - We mark also the class with
@Entityannotation for telling that this is an entity in a database. - This class must have a default constructor.
Now, let's configure the DataSource:
package com.example.jpamysql;

import org.springframework.context.annotation.Bean;
import org.springframework.context.annotation.Configuration;
import org.springframework.jdbc.datasource.DriverManagerDataSource;

@Configuration
public class ConfigApp {

    @Bean
    public DriverManagerDataSource dataSource() {
        DriverManagerDataSource dataSource = new DriverManagerDataSource();

        dataSource.setDriverClassName("com.mysql.cj.jdbc.Driver");
        dataSource.setUsername("root");
        dataSource.setPassword("p");
        dataSource.setUrl("jdbc:mysql://localhost:3306/mydb");

        return dataSource;
    }
}
Now let's configure the EmployeeRepository interface. This interface is specific to Spring Data.
When we configure this interface, the needed classes/methods are autogenerated.
package com.example.jpamysql.interfaces;

import com.example.jpamysql.entity.Employee;
import jakarta.transaction.Transactional;
import org.springframework.data.jpa.repository.JpaRepository;
import org.springframework.data.jpa.repository.Modifying;
import org.springframework.data.jpa.repository.Query;
import org.springframework.data.repository.query.Param;
import org.springframework.stereotype.Repository;
import java.util.Optional;

@Repository
public interface EmployeeRepository extends JpaRepository<Employee, Integer> {

    public Optional<Employee> findEmployeeById(Integer id);

    @Modifying
    @Transactional
    @Query(value = "INSERT INTO employee VALUES " +
            "( :#{#emp.id}, :#{#emp.name}, :#{#emp.email} )", nativeQuery = true)
    public abstract void insert(@Param("emp") Employee emp);
}
Info
The @Modifying annotation is used to let the @Query annotation to allow INSERT, UPDATE, DELETE, and even DDL queries
in addition to SELECT queries.
package com.example.jpamysql;

import com.example.jpamysql.entity.Employee;
import com.example.jpamysql.interfaces.EmployeeRepository;
import org.springframework.boot.SpringApplication;
import org.springframework.boot.autoconfigure.SpringBootApplication;
import org.springframework.context.ApplicationContext;
import java.util.Optional;

@SpringBootApplication
public class JpaMysqlApplication {

	public static void main(String[] args) {
		ApplicationContext context = SpringApplication.run(JpaMysqlApplication.class, args);

		Employee emp1 = new Employee(1, "Dan", "dan@k.com");
		Employee emp2 = new Employee(2, "Anna", "anna@k.com");
		Employee emp3 = new Employee(3, "Paul", "paul@k.com");
		Employee emp4 = new Employee(4, "Helena", null);

		EmployeeRepository eRepository = context.getBean(EmployeeRepository.class);

		// This method is defined in JpaRepository and it is auto-generated.
		eRepository.deleteAll();

		// This method is auto-generated using our definition (implementation)
		eRepository.insert(emp1);
		eRepository.insert(emp2);
		eRepository.insert(emp3);
		eRepository.insert(emp4);

		// This method is defined in JpaRepository, and it is auto-generated.
		Optional<Employee> emp_1 = eRepository.findById(1);

		// This method is defined by us in JpaRepository implementation, and it is auto-generated.
		Optional<Employee> emp_2 = eRepository.findEmployeeById(2);

		System.out.println("Name1="+emp_1.get().getName());
		System.out.println("Name2="+emp_2.get().getName());
	}
}
Info
- Please take a look at the comment above in order to understand how Spring Data is working.
EmployeeRepositorycould extendsCrudRepository,PagingAndSortingRepositoryorJpaRepository. CrudRepository defines the CRUD methods. PagingAndSortingRepository defines methods for pagination and sorting (extends CrudRepository). JpaRepository provides some JPA-related methods such as flushing the persistence context and deleting records in a batch (extends PagingAndSortingRepository).
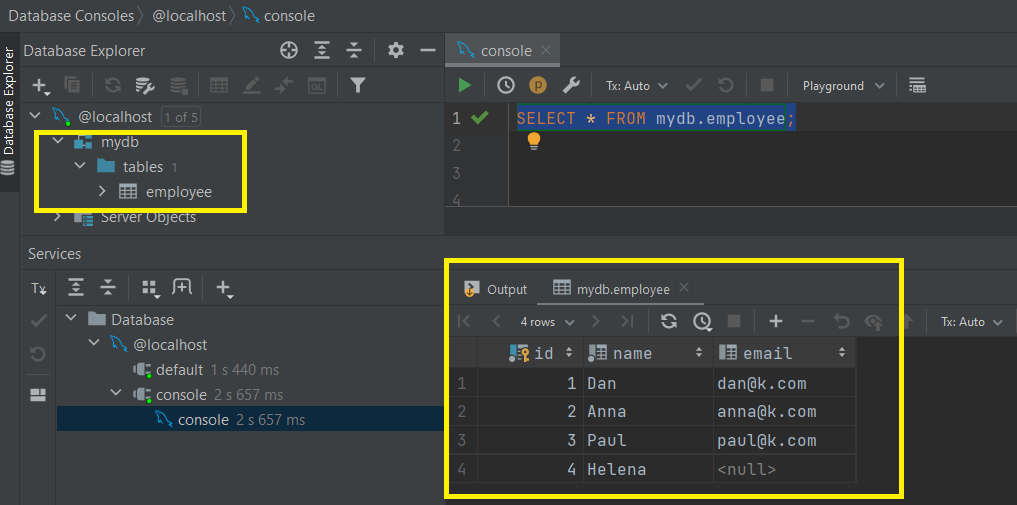
When we run the application we can see in the database the following data:

The console will show us the following:
Name1=Dan
Name2=Anna
